
서론
UserNotifications은 Swift에서 iOS와 macOS 운영 체제를 위한 로컬 및 원격 알림을 관리하고 처리하는 프레임워크로써, 이 프레임워크를 사용하면 앱이 백그라운드에서 실행되는 동안이나 전혀 실행되지 않을 때도 사용자에게 알림을 보낼 수 있다. 우리는 이 UserNotifications을 활용하여 알림 설정을 구현할 것이다.
NotificationManager.swift 파일 생성
아래 코드는 UserNotifications 프레임워크를 사용하여 알림 권한을 관리하고, 앱의 알림 설정 상태를 확인하는 역할을 하는 NotificationManager라는 클래스를 정의하고 있다. 코드의 각 부분을 단계별로 나누어 설명하자면
- 필요한 모듈을 가져오기:
- Foundation: 기본적인 시스템 기능에 대한 액세스를 제공한다.
- UserNotifications: 알림 관련 작업을 수행하기 위한 프레임워크.
- SwiftUI: 사용자 인터페이스 관련 기능을 제공하는 프레임워크.
- NotificationManager 클래스 정의:
- ObservableObject: SwiftUI의 데이터 바인딩 메커니즘과 연동하기 위한 프로토콜이다. 클래스 내부에서 어떤 프로퍼티나 값의 변화가 발생하면 SwiftUI 뷰에게 알려줄 수 있다. (이 코드에서는 실제로 변화를 감지하는 프로퍼티가 없다.)
- 권한 요청 메서드 (requestPermission):
- 알림 권한을 사용자에게 요청한다.
- 권한이 허용되면 completion 클로저를 통해 true를 반환하고, 거부되면 앱의 설정 페이지를 열어 사용자가 수동으로 권한을 변경할 수 있도록 한다.
- 앱 설정 화면 열기 (openAppSettings):
- 이 메서드는 앱의 설정 페이지를 열어주는 역할을 한다. 사용자가 알림 권한을 거부하면, 이 메서드를 통해 사용자를 앱 설정 화면으로 안내하여 수동으로 권한을 변경하게 할 수 있다.
- 알림 설정 확인 메서드 (checkNotificationSettings):
- 현재 앱의 알림 설정 상태를 확인한다.
- 알림이 활성화되어 있으면 true를, 그렇지 않으면 false를 completion 클로저를 통해 반환한다.
//
//  NotificationManager.swift
//  webApp
//
//  Created by mingyukim on 11/6/23.
//

import Foundation
import UserNotifications
import SwiftUI

class NotificationManager: ObservableObject {

    func requestPermission(completion: @escaping (Bool) -> Void) {
        UNUserNotificationCenter.current().requestAuthorization(options: [.alert, .badge, .sound]) { [weak self] granted, error in
            // 오류 체크: 요청 과정에서 오류가 발생했는지 확인합니다.
            if let error = error {
                print("Error requesting permissions: \(error)")
                return
            }

            DispatchQueue.main.async {
                if granted {
                    // 권한이 허용된 경우
                    completion(true)
                } else {
                    // 권한이 거부된 경우, 사용자를 설정 페이지로 안내합니다.
                    self?.openAppSettings()
                    completion(false)
                }
            }
        }
    }

    // 사용자를 이 앱의 설정 화면으로 안내하는 메서드입니다.
    private func openAppSettings() {
        guard let settingsUrl = URL(string: UIApplication.openSettingsURLString) else {
            return
        }

        if UIApplication.shared.canOpenURL(settingsUrl) {
            UIApplication.shared.open(settingsUrl)
        }
    }

    // 현재 알림 설정을 검색하는 메서드
    func checkNotificationSettings(completion: @escaping (Bool) -> Void) {
        UNUserNotificationCenter.current().getNotificationSettings { settings in
            DispatchQueue.main.async {
                switch settings.authorizationStatus {
                case .authorized, .provisional:
                    // 알림이 활성화된 경우
                    completion(true)
                default:
                    // 알림이 비활성화된 경우
                    completion(false)
                }
            }
        }
    }
}AlarmViewModel.swift 파일 생성
초기 개발, 프로토타이핑 또는 테스트용으로 ViewModel 내에 데이터를 포함시킨다. 하지만 실제 운영 앱에서는 ViewModel이 데이터 소스와의 연동, 데이터 처리 로직, 데이터 변화 감지 등의 역할을 담당하도록 설계하는 것이 좋다.
//
//  AlarmViewModel.swift
//  webApp
//
//  Created by mingyukim on 11/6/23.
//

import Foundation

struct NoticeItem: Identifiable {
    var id = UUID()
    var title: String
    var description: String
    var updatedText: String
}

class AlarmViewModel: ObservableObject {

    @Published var items: [NoticeItem] = [
        NoticeItem(title: "알림1", description: "알림1 내용입니다.", updatedText: "2분 전"),
        NoticeItem(title: "알림2", description: "알림2 내용입니다.", updatedText: "10분 전"),
        NoticeItem(title: "알림3", description: "알림3 내용입니다.", updatedText: "1시간 전"),
        NoticeItem(title: "알림4", description: "알림4 내용입니다.", updatedText: "3시간 전"),
        NoticeItem(title: "알림5", description: "알림5 내용입니다.", updatedText: "2일 전"),
    ]
}AlarmView.swift 파일 수정
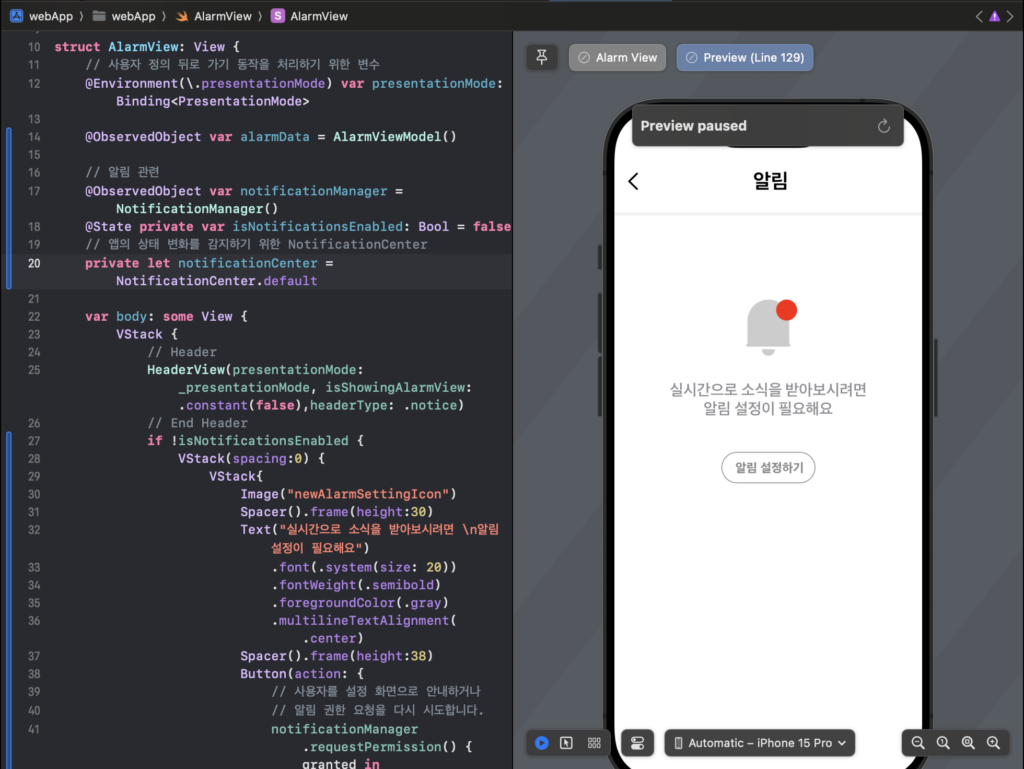
AlarmView는 알림 목록을 표시하는 뷰로써, 사용자의 알림 설정 상태에 따라 적절한 컨텐츠를 표시한다. 만약 알림이 비활성화되어 있다면, 사용자에게 알림 설정을 활성화하도록 안내한다.
설정이 활성화되어 있다면, 저장된 알림 목록을 표시하고, 사용자는 이 목록에서 알림을 삭제할 수도 있다. 또한, 앱이 활성 상태로 전환될 때마다 알림 설정을 자동으로 확인한다.
// ...
// 추후 외부 주입으로 변경 예정
@ObservedObject var alarmData = AlarmViewModel()
@ObservedObject var notificationManager = NotificationManager()

// 앱의 상태 변화를 감지하기 위한 NotificationCenter
private let notificationCenter = NotificationCenter.default

// ...

.onAppear(perform: {
    // View가 표시될 때 초기 알림 설정 상태 확인
    checkNotificationSettings()

    // 앱이 활성화될 때마다 알림 설정 상태를 확인하도록 NotificationCenter에 옵저V버를 추가합니다.
    notificationCenter.addObserver(forName: UIApplication.willEnterForegroundNotification, object: nil, queue: .main) { [notificationCenter] _ in
        // 앱이 포그라운드 상태로 전환될 때 알림 설정을 확인합니다.
        self.checkNotificationSettings()
    }
})
.onDisappear(perform: {
    // View가 사라질 때 NotificationCenter의 옵저버를 제거합니다.
    // 추후 self가 아닌 특정 observer로 변경 예정
    notificationCenter.removeObserver(self)
})
// ...결과물
'SwiftUI > 웹개발자의 IOS 탐방기' 카테고리의 다른 글
| [웹개발자의 IOS 탐방기] 8. SwiftUI 웹앱에 FCM Push 알림 구현하기 (0) | 2023.11.24 |
|---|---|
| [웹개발자의 IOS 탐방기] 7. UserDefaults를 사용한 로컬기기에 알림 권한설정 값 저장하기 (2) | 2023.11.08 |
| [웹개발자의 IOS 탐방기] 5. ListView를 사용한 알림 화면 구현 (0) | 2023.11.08 |
| [웹개발자의 IOS 탐방기] 4. VStack HStack을사용하여설정창 UI 구현 (0) | 2023.11.08 |
| [웹개발자의 IOS 탐방기] 3. NavigationView 컨테이너뷰를 사용하여 설정창 띄우기 (0) | 2023.11.08 |